
Send data via the API
Deciding how to send data, or making a script faster or safe to rerun? Start with Push data to Ronja, the playbook. This page is the endpoint-by-endpoint walkthrough.
If the data is already sitting in your own database — PostgreSQL, MySQL, SQL Server or BigQuery — neither push API is the shortest path. Store the credentials as a secret, create a connection that references it, and Ronja syncs the tables you choose on the cadence you set: she owns the bookmark that tracks how far she got, resumes a run that outgrew its window, and lands each table in a Feature as an Integration table. The endpoints are summarized under Database connections, and the full recipe — create, discover, choose tables, run, poll — is served on your Ronja domain at /docs/api/guides/import-a-database.md. It needs Admin.
Create an API token
Section titled “Create an API token”- Open API Tokens in the admin sidebar (under People & Access).
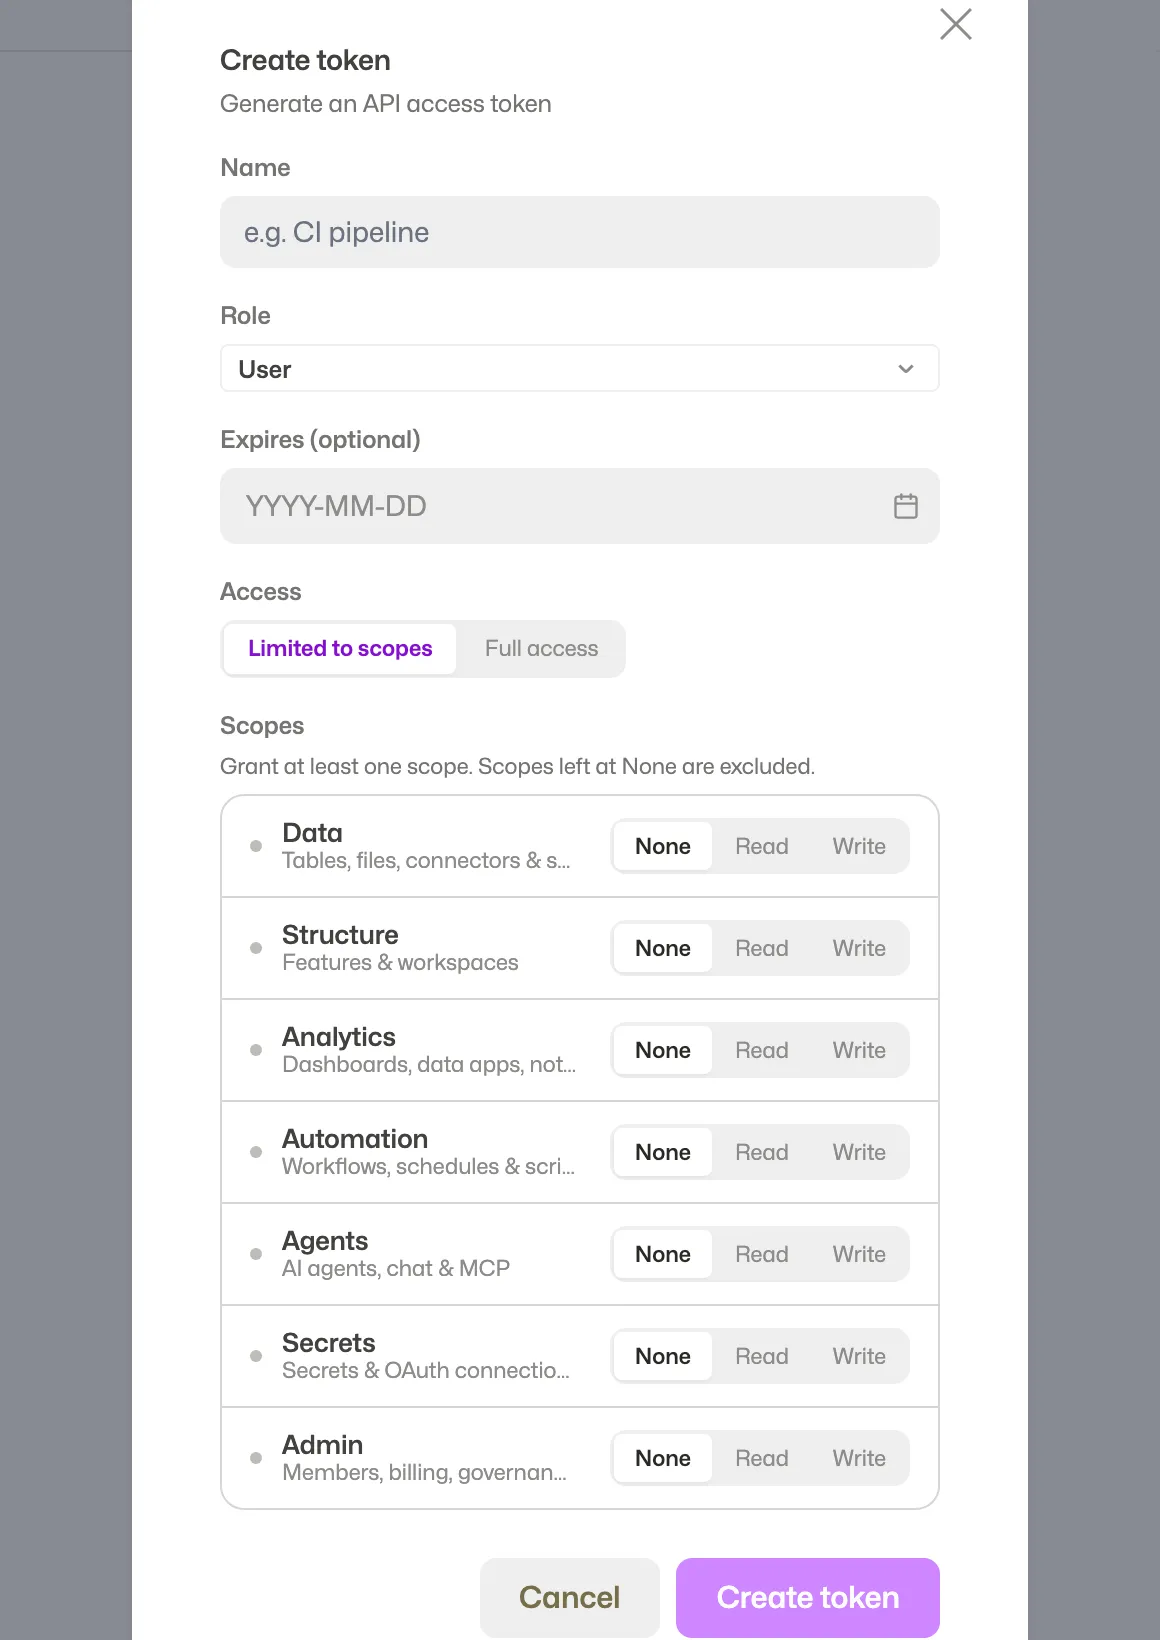
- Click Create token. In the Create token modal, fill in Token name (e.g.
CI pipeline) and pick a Role — the role bounds everything the token can do. - Keep the access setting on Limited to scopes (the default) and grant only what your integration needs: each scope (Data, Structure, Analytics, Automation, Agents, Secrets, Admin) can be None, Read, or Write. Full access skips scope limits entirely and shows a red warning — prefer Limited.
- Click Create token and use Copy token in the Token created modal, then click Done.
 Copy the token before closing this dialog; you cannot display it again.
If the token is created but its role cannot be assigned, keep the dialog open and use Retry role assignment. This retries the role change on the same token. Copy the token before closing; you can also change its role later in the list.
Send the token on every request in the Authorization header. The interactive API reference is served at /docs/api on your Ronja domain; a summary is in the API reference.
Push data files
Section titled “Push data files”The file push API feeds a manual-integration table — a table whose data you push from your own systems instead of syncing through a connection. It accepts Parquet files only, sent as a raw request body (never multipart), up to 1 GiB per file. Convert CSV first, for example:
python -c "import pandas as pd; pd.read_csv('sales.csv').to_parquet('sales.parquet')"-
Create the table once —
featureID, the feature that will own the table, is a required body field alongsidename. The response contains the table ID,table-…, which also appears in the table’s URL in the app:Terminal window curl -X POST "$RONJA_BASE_URL/api/v2/feature/model" \-H "Authorization: $RONJA_API_TOKEN" \-d '{"name":"sales_pushes","kind":"manual_integration","featureID":"<your feature ID>"}' -
Upload a file:
Terminal window curl -X PUT \"$RONJA_BASE_URL/api/v2/feature/model/table-a1b2c3d4e5/file/sales_2026.parquet" \-H "Authorization: $RONJA_API_TOKEN" \--data-binary @./sales_2026.parquet# -> 200 {"filename":"sales_2026.parquet","size":48230}Re-uploading the same filename replaces the previous file; different filenames accumulate and are built together.
-
List or delete files as needed:
Terminal window curl "$RONJA_BASE_URL/api/v2/feature/model/table-a1b2c3d4e5/files" \-H "Authorization: $RONJA_API_TOKEN"curl -X DELETE \"$RONJA_BASE_URL/api/v2/feature/model/table-a1b2c3d4e5/file/old.parquet" \-H "Authorization: $RONJA_API_TOKEN" -
Build to make the data queryable — uploading alone is not enough:
Terminal window curl -X POST "$RONJA_BASE_URL/api/v2/feature/model/table-a1b2c3d4e5/build" \-H "Authorization: $RONJA_API_TOKEN"The build runs asynchronously; poll
GET /api/v2/feature/model/table-a1b2c3d4e5and branch onbuildVerdict— the one field that already accounts for the trap below. Keep polling while it reads"building"or"pending";"ok"means the build landed,"failed"and"failed_stale"mean it did not, and"ok_partial"means it landed but skipped source files it could not read — the table is queryable, with less data in it than you uploaded. (Those are five of seven values; the full list is in the API reference.) That trap is why the field exists: a table that already held data is put back to"ready"after a failed rebuild — it keeps serving its last good data — sostatusalone would report success on a build that never landed.lastBuildErroron the same response tells you why it failed. The schema is detected automatically from the Parquet files.From the CLI,
--wait-untilruns that poll for you — see Waiting for something to finish.A Build of a table that is still building is refused with a 409: the build already running is not restarted, so the files you just uploaded may not be in it. Wait for it to finish, then run Build again.
Once the build lands, every table derived from this one starts rebuilding itself (unless you held the rebuild back — see Send several tables at once) — but that cascade runs on its own clock, separately from the build you just polled to completion.
buildVerdict: "ok"tells you this table’s data landed, not that its dependents have caught up yet; a dependent may briefly still serve its previous rows. If a downstream read has to reflect this upload, wait on that dependent table too — on itslastBuiltAt, the way the section on writing rows below describes, because a quick rebuild can take itsbuildVerdictfrom"ok"back to"ok"between two polls. A dependent built from several inputs may also hold off on purpose: it rebuilds once, after the last of its inputs has caught up with the same change, so a bounded wait on it can expire while it is healthy and still waiting — poll it again rather than reading the expiry as a failure. A dependent that is parked — its own inputs are no longer all there — does not rebuild. The first time, it shows a failed build whoselastBuildErrornames the missing input, which ends the wait; after that nothing about it changes, so a later wait on it expires. Either way, read itsbuildVerdictandlastBuildErrorrather than treating an expiry as a failed call. From the CLI, the same guarded wait applies per dependent — see Waiting for something to finish.
$RONJA_BASE_URL is your organization’s Ronja URL. Tokens are bound to your organization — a token from one organization can never read or write another’s tables.
Push rows
Section titled “Push rows”A Dynamic table holds records your own app or scheduled script produces. Send them as JSON rows, or — for bulk loads — as a Parquet file. There is no build step: when the write returns, the rows are queryable.
-
Create the table once (an Admin, the owner of a Private Feature, or a maintainer of an Organization Feature):
Terminal window curl -X POST "$RONJA_BASE_URL/api/v2/feature/model" \-H "Authorization: $RONJA_API_TOKEN" \-d '{"name":"order_events","kind":"dynamic","featureID":"<your feature ID>","fields":[{"name":"sku"},{"name":"qty"}]}'The table can be queried from the moment it is created, and returns no rows until the first write — so pass
fieldson the create call if a query names its columns before then: on a Dynamic table those names also declare the columns a query sees before anything has been pushed, which is what makes aUNIONwith your history table work at go-live. Each entry is an object carrying the column’sname, as above, never a bare string. The column you query is the normalized form of the name — lowercased and sanitized the way the first write would produce it — so{"name":"Qty"}is queried asqty. Sending the same name twice is a 400; the match is on the name as written apart from surrounding spaces, soQtyandqtycount as two names, both resolving to the one columnqty. Until the first write the table declares every name stored for it: the ones on the create, with or without adescription, plus any name a laterPUTsends with a description — a bare name on aPUTadds nothing, so recreate the table (it has no data yet) if a name on the create was wrong. Nothing has been written yet, so the create answers withunmatchedColumnslisting every name you sent, and a name stays unmatched until a write produces a column of that name. The first write settles the declaration: a bare name —skuandqtyabove carry no description — is dropped unless that write produces it, while a name you gave adescriptionis kept, stays unreported, and attaches by itself if a later write produces that column. -
Write rows.
writeModeisappend(the default) orreplace:Terminal window curl -X POST \"$RONJA_BASE_URL/api/v2/feature/model/table-a1b2c3d4e5/rows" \-H "Authorization: $RONJA_API_TOKEN" \-d '{"rows":[{"sku":"A1","qty":3},{"sku":"B2","qty":7}],"writeMode":"append"}'# -> 200 {"tableID":"table-a1b2c3d4e5","rowsWritten":2,"writeMode":"append","partitionCount":1,"cascade":"immediate"} -
Read it back — no build needed:
Terminal window curl -X POST "$RONJA_BASE_URL/api/v2/duckdb/query" \-H "Authorization: $RONJA_API_TOKEN" \-d '{"sql":"SELECT sku, qty FROM {{ ref('"'"'table-a1b2c3d4e5'"'"') }}"}'Or
ronja queryfrom the CLI, which fails loudly where this endpoint answers success with an error inside — see Query your data.Name the columns, rather than writing
SELECT *, in any query you deploy before the first write — above all in aUNIONwith a history table. Before that write the columns come out in alphabetical order; afterwards they come out in the order the data produced them, and aUNIONpairs columns by position, so aSELECT *keeps working and starts pairing the wrong columns.
Column names and types are taken from the JSON values — a string is text ("020" keeps its leading zero), true/false is a boolean, a number is a number — so send numbers as numbers: "qty": "3" makes a text column, and on a column that already holds numbers it is a type change. New columns are added automatically on a later write. A column whose type changes is widened to a type that holds both — a whole number meeting a decimal reads as a decimal, anything meeting text reads as text, except binary data, which stays binary when it meets text — and the write lands. When the two types can’t be read together at all (a date meeting a number), the values in that write are stored as text instead and the column reads as text from then on. Two kinds of change are refused, and nothing lands: a column changing between a nested shape — a list or an object — and anything else, and a column that can’t be read alongside the stored one and can’t be rewritten as text either (a decimal, a time-of-day, a legacy-format timestamp, or one of the rarer binary-encoded types: a half-precision float, an interval, a geometry or geography value, or a BSON document — the binary form of JSON that MongoDB and some other databases export). A half-precision float is refused even when it meets a column of numbers — send it as an ordinary (32- or 64-bit) float. On a write that lands, the response’s warnings names each column that moved and says what happened to it; a refusal comes back as a 400 whose error message names the column instead. If the table’s schema policy is Strict rather than the default Widen, none of that applies — an added, missing or retyped column is refused instead. See When a column changes type.
A Dynamic table that existed before September 2026 keeps the older reading of JSON values: its jsonTyping on GET /api/v2/feature/model/{tableID} is "legacy", a numeric-looking string such as "020" is stored as the number 20, true/false is stored as text, and every write to it says so in warnings — one line per column, counting the values the older reading would have re-typed. Nothing about such a table changes until you switch it. The raw write is the landing zone and typing belongs downstream — the producer does not have to change: cast the named columns in the Derived tables that compute on them (amount::DOUBLE), then PUT /api/v2/feature/model/{tableID} with {"jsonTyping":"typed"} — or empty the table, which switches it too. A table created since reads JSON types from the start. On the table’s page a Legacy typing marker shows which tables are still on the older reading.
Each write counts as an update to the table: the Derived tables built from it rebuild themselves, and any Automation watching it fires — the same as an edit made inside Ronja. The one exception is a write that holds the rebuild back until you release it, described in Send several tables at once. GET /api/v2/feature/model/{tableID}/dependents lists the tables built from it, one level down — the ones you can see, so a colleague’s table in a Feature you have no access to is left out of the list rather than refusing the call. The rebuild runs on its own clock, separately from your write, and a quick one can finish before you first look. If a read of a Derived table has to reflect this write, note that table’s lastBuiltAt and lastBuildError before you write, then poll it until one of them changes: a successful rebuild moves lastBuiltAt, while a rebuild that fails leaves lastBuiltAt alone — unless it failed after its data had already landed, which moves both — records a new lastBuildError, and the table shows Out of sync — showing data from last successful build. Give that poll a timeout: a rebuild whose code ran to completion without saving a result publishes nothing, so it moves neither, and the table keeps the rows and the clock it already had — if buildVerdict has left building and neither has changed, that rebuild published nothing. A moved lastBuiltAt means the ROWS: it is written in the same step that publishes them, so they are queryable the moment it changes, while buildVerdict can still read building for an instant and the table’s column list can still describe the previous build. If what you need is the column list rather than the rows, wait for buildVerdict to leave building too. If the Derived table is already rebuilding when you look (buildVerdict reads "building" or "invalidated"), let that rebuild finish before you note anything and write: it read its inputs before your write, so when it finishes lastBuiltAt changes without your rows in it.
Sending a lot of data at once
Section titled “Sending a lot of data at once”If you already have a Parquet file — or the 50,000-row / 8 MiB JSON limits are in your way — send the file itself to the same table. JSON is a bulky envelope for tabular data, so the same rows take a small fraction of the bytes, and the limit rises to 1 GiB per request with no row cap:
curl -X POST \ "$RONJA_BASE_URL/api/v2/feature/model/table-a1b2c3d4e5/rows/parquet?writeMode=append" \ -H "Authorization: $RONJA_API_TOKEN" \ -H "Content-Type: application/octet-stream" \ --data-binary @data.parquet# -> 200 {"tableID":"table-a1b2c3d4e5","bytesReceived":48219,"writeMode":"append","partitionCount":2,"cascade":"immediate"}writeMode is a query parameter here (there is no JSON body to carry it), and it works exactly as it does for rows: append (the default) or replace. The file is checked before anything is written — a body that is not a readable Parquet file is rejected and nothing lands. Everything else is identical to writing rows: same access, same automations, same snapshots, same partition ceiling.
To empty a dynamic table, POST /api/v2/feature/model/{tableID}/clear with an optional {"reason":"..."}. The contents are snapshotted first: list snapshots with GET .../dynamic-versions and put one back with POST .../dynamic-versions/{versionID}/restore. Snapshots expire after 7 days. Clearing and restoring take the same access as writing rows — whoever can push rows to a table can also empty it and put it back.
Clearing keeps the table’s column names, so a query that names them keeps working against the now-empty table. Column types still come from a write, so until the next one those columns are untyped and a query has to cast — some_column::TIMESTAMP — before a date function.
Clearing and restoring also count as updates to the table, so any Automation watching it fires — which means an Automation can run against a table you have just emptied. Pause it first, or make sure whatever it does copes with zero rows.
Clearing also sends the Derived tables built from it into a rebuild that fails — a clear removes the table’s data and its column types, not just its rows, so there is nothing to build from — so they keep showing their data from before the clear, with a banner reading “Showing data from … Updates have failed since …” and a Not updating marker (a table with no earlier data shows Build failed instead) — see When a table stops updating. The next write rebuilds them — a write that lands while that failed rebuild is still running is picked up by a follow-up rebuild, so you can clear and reload back to back. Restoring rebuilds them the same way.
Send several tables at once
Section titled “Send several tables at once”When one run of your script sends several tables that a Derived table reads together — orders and customers, joined in a report — each table normally rebuilds the report as soon as it lands. The first rebuild then joins the new orders with the old customers: a result that never existed, published like any other build, which also fires any Automation watching the report. The next table rebuilds it again.
To land the whole set as one change, hold back each table’s rebuild and release them all together:
-
Send every write with
?cascade=deferadded to the URL:- for a Dynamic table, on the row push (
/rows), the Parquet upload (/rows/parquet) and on emptying the table (/clear); - for an Integration table you push files to, on Build (
/build). Start every build before you wait on any of them, then wait for each to finish, as in Push data files.
The data lands as usual and is queryable at once. Each table’s own Automations and health checks run now. Only the Derived tables built from it wait.
- for a Dynamic table, on the row push (
-
Check the
cascadefield on each write’s response."deferred"means the rebuild is held for you."immediate"means that write has already rebuilt its Derived tables, because the hold could not be recorded. The data landed either way, so carry on with the rest. On a Build, the field echoes what you asked for, because the build itself runs afterwards. -
Release them in one call, naming every table you sent:
Terminal window curl -X POST "$RONJA_BASE_URL/api/v2/feature/model/cascade" \-H "Authorization: $RONJA_API_TOKEN" \-d '{"tableIds":["table-a1b2c3d4e5","table-f6g7h8i9j0"]}'# -> 200 {"released":["table-a1b2c3d4e5","table-f6g7h8i9j0"],"notPending":[]}Every Derived table built from them rebuilds once, over all of them together, and any Automation watching it runs once.
The same loop in Python, for two Dynamic tables:
import os, requests
BASE = os.environ["RONJA_BASE_URL"]S = requests.Session()S.headers["Authorization"] = f"Bearer {os.environ['RONJA_API_TOKEN']}"
def check(r):  # raise_for_status() would drop the reason Ronja gives in the body    if not r.ok:        raise RuntimeError(f"{r.status_code} {r.request.method} {r.url}: {r.text}")    return r
def write_rows(table_id, rows):    r = check(S.post(f"{BASE}/api/v2/feature/model/{table_id}/rows",                     params={"cascade": "defer"}, json={"rows": rows, "writeMode": "replace"}))    if r.json().get("cascade") != "deferred":        print(f"{table_id}: its Derived tables rebuilt at once")
write_rows("table-a1b2c3d4e5", orders)write_rows("table-f6g7h8i9j0", customers)
r = check(S.post(f"{BASE}/api/v2/feature/model/cascade",                 json={"tableIds": ["table-a1b2c3d4e5", "table-f6g7h8i9j0"]}))print(r.json())
What to expect:
- Releasing is safe to repeat. It releases only what is still held. A table listed under
notPendinghad nothing held: it was never sent with?cascade=defer, its response said"immediate", its Build failed before its data landed, or it was already released — by an earlier call, by the automatic release below, or by an ordinary write to that table, which rebuilds its Derived tables at once. - A table still building is refused. If any table you name is still building, the call answers 409 and releases nothing, because releasing the others would rebuild the report over half the set. Wait for that build, then call again.
?cascade=deferon a Build of a table that is already building is refused with a 409 too: wait for that build, then build again. - The release is automatic after 15–20 minutes. A table nobody releases is released on its own about 15–20 minutes after its first held write. A forgotten release costs you that delay and nothing else. A batch that takes longer than that has its oldest tables released partway through, so send everything first and release straight after.
- The Derived tables normally keep their previous data while they wait. Your held writes don’t move their
lastBuiltAtuntil the release. If one of them also reads a table that someone else changes after your first held write, it waits for your release instead of rebuilding over half of your batch — at most the same 15–20 minutes — and the Data map’s Builds lens shows it as Waiting on an input, naming your table. - Refusals. A table you can’t write, a table ID that doesn’t exist and one from another organization all get the same 404. Only a Dynamic table, or an Integration table you push files to, can be released; any other table is a 400, since a Derived table has no write of yours to release, and so is an empty list or more than 100 tables. A 503 is safe to retry: if the retry lists the tables under
notPending, the first call had already released them. - Access. Releasing needs write access to every table you name, the same as writing rows.
- If a write fails partway, retry it before you release. Release only once every table has landed: a hold cannot be cancelled, so if you give up, the tables you already wrote are released after 15–20 minutes anyway and the Derived tables rebuild over the part of the set that landed. A
replacewrite is safe to send again, and a 409 on a write means the table was busy and nothing was written. Push data to Ronja has a complete script that retries.
Let Ronja call your API
Section titled “Let Ronja call your API”A Ronja API credential lets Ronja’s own agents and workflows call your Ronja API directly, for operations the built-in tools don’t already cover (general resource reads and writes, and so on). It is a scoped API token sealed inside a secret — the same kind of stored credential you’d use for any external service, but pointed back at your own Ronja organization.
The easiest way is to ask Ronja in a chat: as an Admin, tell Ronja to “create a Ronja API credential” and it mints one for you, pausing for your approval before it lands. The credential defaults to a safe read-oriented scope and to your working feature, and the token is sealed in the secret — never shown. If you are not an Admin, ask an Admin to create it (they can do it right in a chat).
The credential lives in a personal Feature you own, which keeps it personal. A shared Feature is refused — its members would be able to see the credential — and that bound applies to Admins as well, so being an Admin does not let you place one where colleagues can read it. The remaining settings:
scopeGrantsis optional. Omit it and the credential defaults to a read-oriented grant (Data, Structure, and Analytics at Read), which deliberately excludes the Agents and Automation scopes so a defaulted credential can’t start agent sessions or fire automations. Grant only what the work needs — the same scopes as any API token, each at Read or Write.roleis optional and defaults to Admin, so the credential can reach role-gated read endpoints — such as listing every table in the organization — that a User-role token would be denied. Role and scope are independent, so the read-onlyscopeGrantsdefault above still bounds what it can write. Pass User for a narrower credential; the role is capped to your own.expiresInDaysis optional. Omit it and the credential never expires, so an app or automation built on it does not suddenly stop working. Pass a number of days only if the credential should stop authenticating after that long; it then has to be re-created. To retire a credential, delete its secret.- The token itself is never shown — it is sealed in the secret and cannot be read back by anyone, including you. If you need a different scope or role, create a new credential.
A Ronja API credential can’t be used to create another Ronja API credential, and each organization can hold a limited number of them at once — delete an unused credential (delete its secret) before creating a new one if you hit the limit.
The credential’s underlying token appears in your API Tokens list marked Managed by secret, with a link back to the secret. You can’t delete it from there — deleting the secret revokes the token, which stops working within 30 seconds. On the secret’s own page a Ronja API token badge marks it as a self-call credential, and Admins get a View token link to its token.
Once the credential exists, an agent or workflow simply references the secret; Ronja injects the Authorization header automatically, so the token never appears in a prompt or a workflow’s code. Referencing one from a workflow takes an Admin: when a non-Admin saves a workflow that references a Ronja API credential, the reference is dropped and the save reports it as a warning rather than failing. Because the credential is scoped, it can only reach the routes those scopes allow — see API reference for the reachability caveat.
Admins can also just ask Ronja to read the API. Ronja can look up an endpoint and fetch it directly in a chat, with no credential involved — it runs as you, with your own permissions, and is read-only. That covers most “what does the API say about X?” questions without creating a credential at all. Creating, updating and deleting through the API still needs a credential, or a native action.
Using a credential in a chat is Admin-only. Asking Ronja to call your API with the credential requires an Admin; a non-Admin is told to ask one. Automations and saved Agents are the way to delegate: an Admin attaches the credential to an automation or a saved Agent, and it then runs for whoever triggers it, Admin or not — the credential is part of what the Admin approved when they set it up. An automation that does not list the credential among its references cannot use it.