
Manage users and roles
User management lives on Users & Access in the admin area: a matrix with one row per member and one column per access group. Each cell shows whether that person is a member of that access group — scroll inside the matrix to browse people and groups. Group headings stay visible as you move down the rows, and names stay visible as you move across the groups when there is room. Drag the divider after User to widen the column, or choose Fit emails to show complete addresses; very long addresses wrap. The divider also works with the arrow keys (Shift for larger steps), Home/End, and Enter to fit. Expanded columns scroll with the table when there is too little room to keep names pinned. Find people with the search box (“Search by name or email”) and the Role and Status filters.
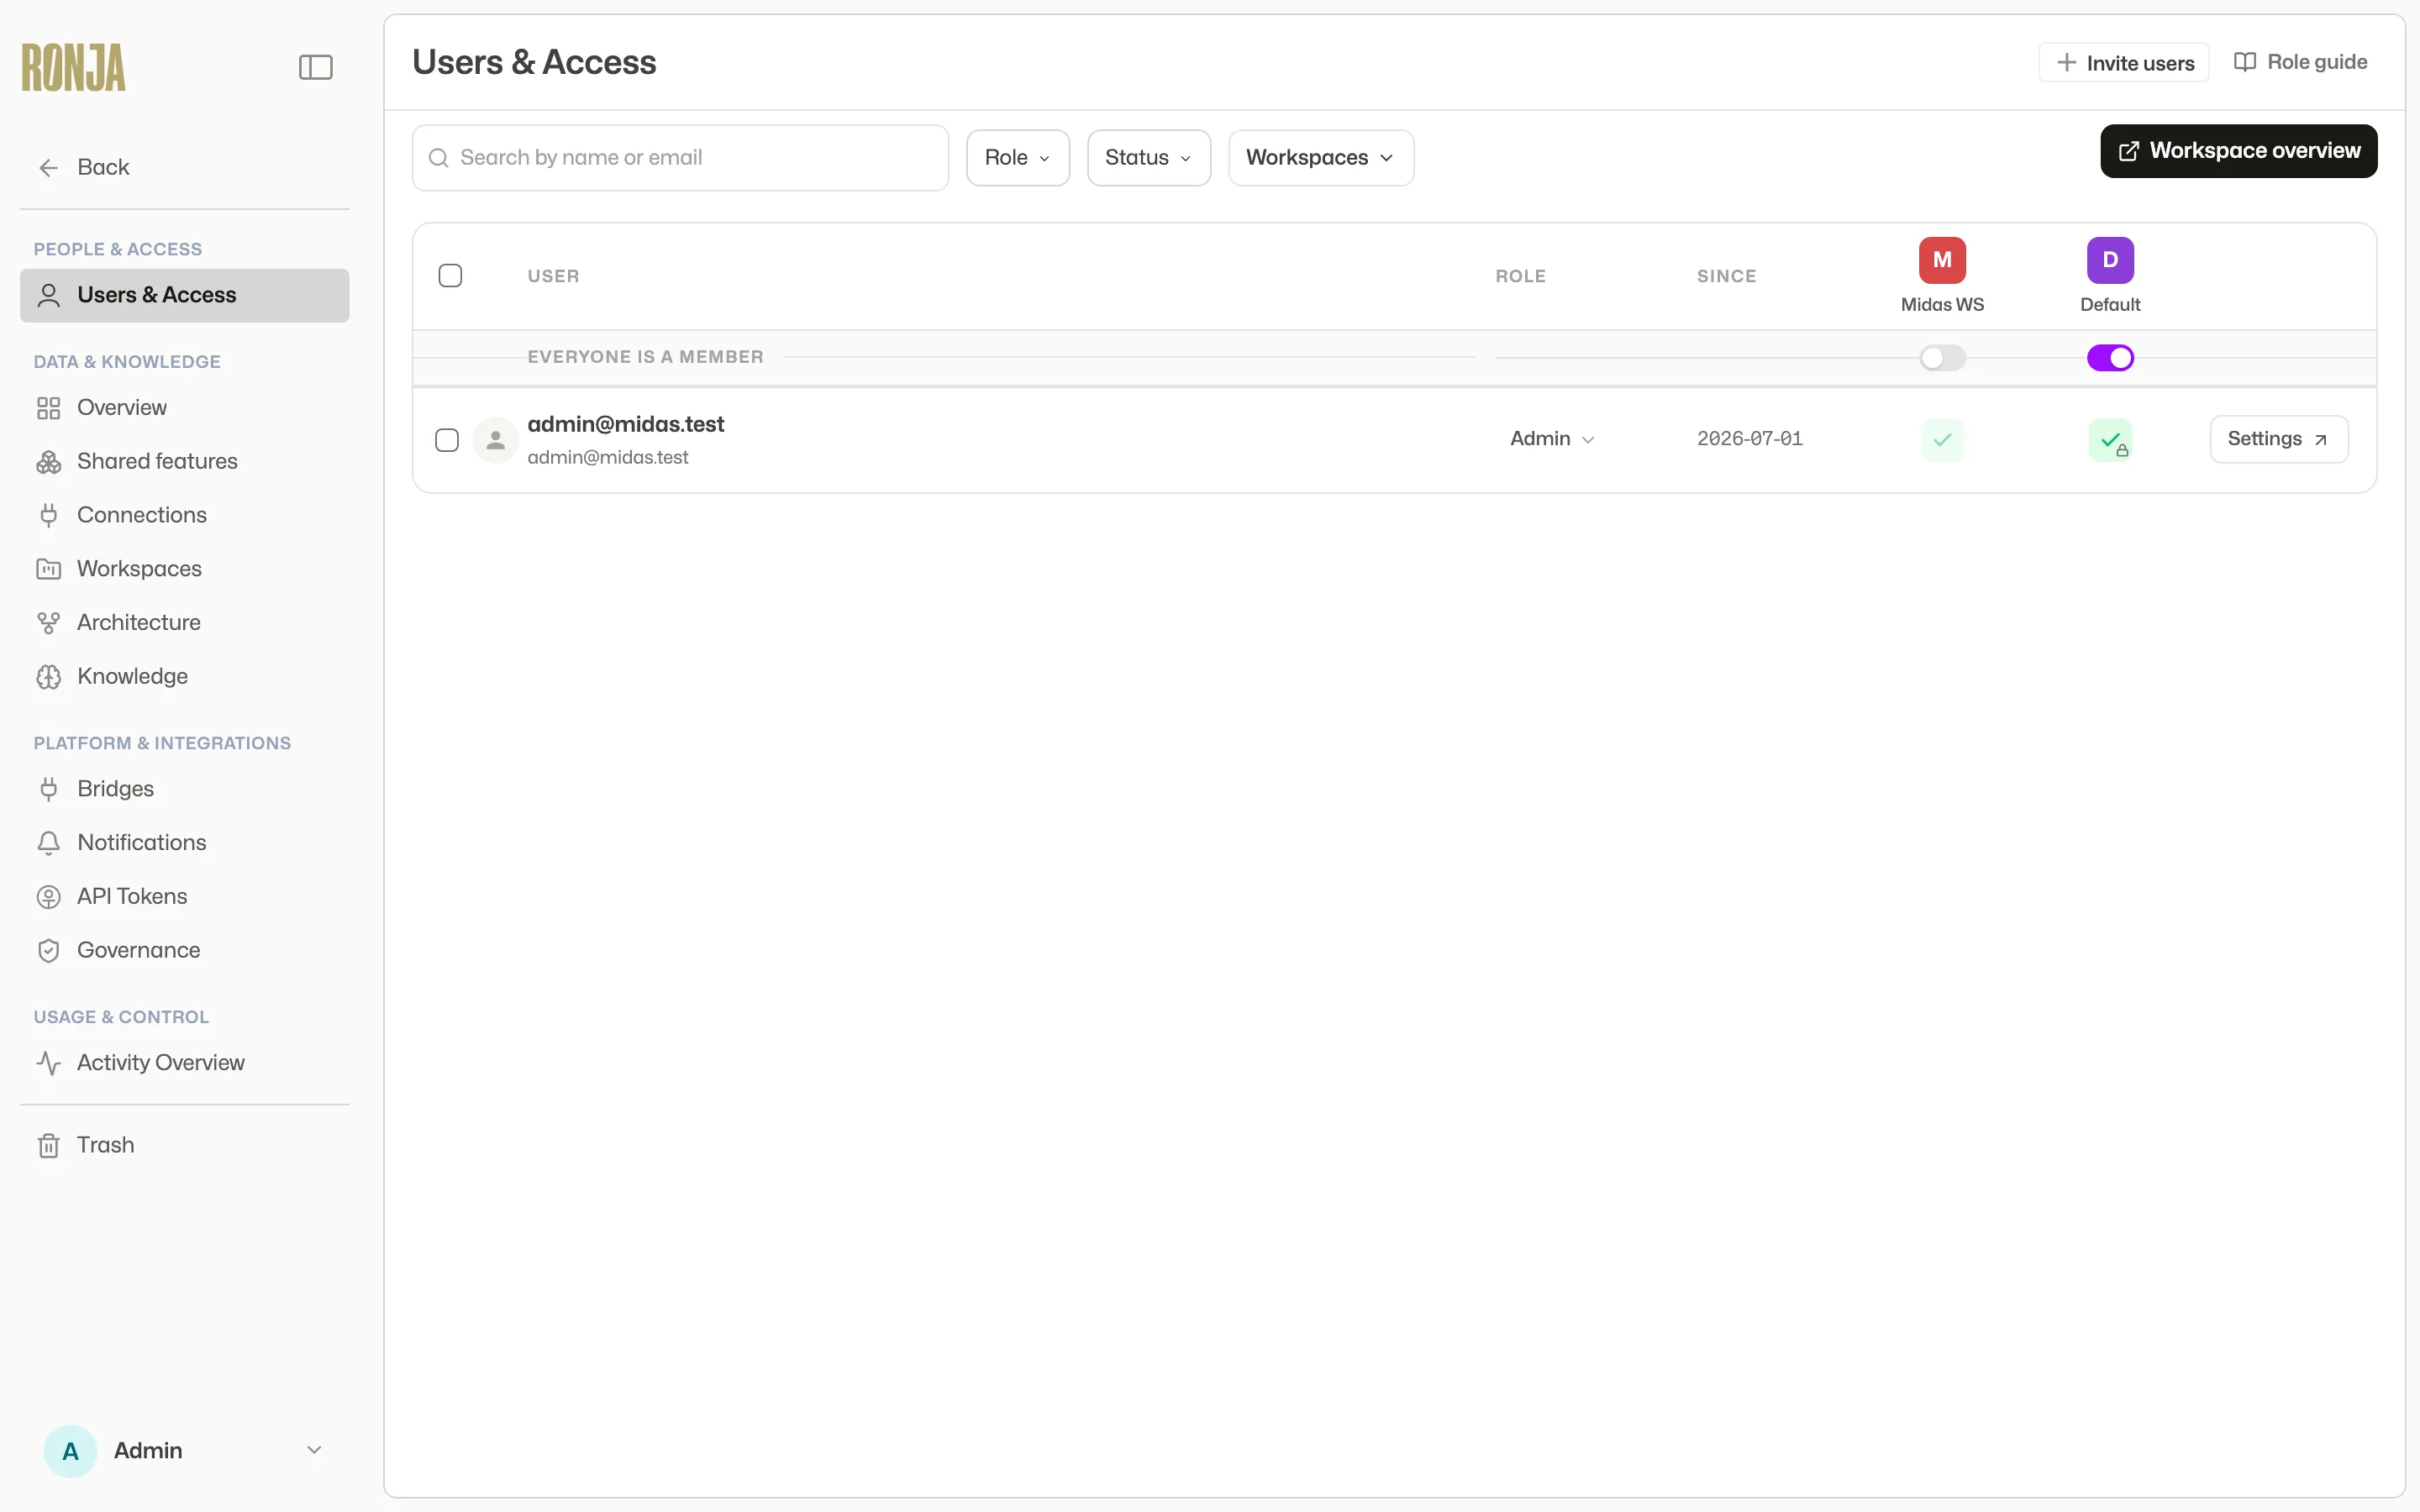 The Users × Access Groups matrix — people, roles, and access group membership in one view.
A Ronja staff chip beside a name marks a member of the Ronja team, for example someone helping you set up. It appears on their row and at the top of their settings page. Ronja decides who carries it; your organization can’t add or remove the chip itself. What you can do is remove the person: any Admin can remove a Ronja staff member from the organization, whatever their role (see Edit one user).
Invite members
Section titled “Invite members”- Click Invite users.
- Enter Email addresses in the Invite users dialog, separated by commas or new lines.
- Click Send invite (or Send N invites). Each person receives an invitation email and appears in the matrix with an Invited label until their first login.
Use Resend invite beside an Invited member to send another invitation. If a batch stops partway through, the dialog keeps only the unsent addresses so you can retry them.
Assign roles
Section titled “Assign roles”Click a row’s role control and pick from the list; a checkmark identifies the current role. With the control focused, use the arrow keys or type a role name to move through the options, Enter to choose, and Escape to close without changing the role. A role is organization-wide: if your organization has more than one Space, the page lists one Space’s people at a time, but the role you assign applies in every Space — the role list says so at the top. The four roles are explained in Roles and permissions, and the exact capability table is in the roles matrix — the Role guide button on this page opens the same overview in-product (“What each role can do”).
The guardrails:
- An Admin can only hand out roles below their own level — User, User Read-Only. Only the Super Admin can make someone Admin or Super Admin.
- An Admin can’t change the role of another Admin or a Super Admin. Their role control is locked, and says “Your role can’t change this person’s role.” A bulk role change skips them and tells you how many it skipped. Your own role is never locked this way.
- You can’t demote yourself if you’re the only person at your level or higher: “Promote another teammate to at least {role} first, then change your own role.”
- Nobody can take away the organization’s last Super Admin — not by changing their role, removing their role, removing them from the organization or deleting their account: “This is the organization’s last Super Admin. Make someone else Super Admin first.” An API token with the Super Admin role doesn’t count; the organization needs a person in it.
Inviting a member, removing one, and assigning or removing a role are browser-only — they refuse an API token, the CLI and automations, whatever their permissions. So does adding someone to an access group, below; removing them again narrows access and stays scriptable. See Actions the API can’t take.
Read-only members and Ronja’s AI
Section titled “Read-only members and Ronja’s AI”Expand Read-only AI access below the matrix to see its toggle. It decides whether members on the User Read-Only role can hold their own conversations with Ronja. It’s on by default, and it applies to the whole organization — including when a read-only member asks Ronja from Slack or Teams. A read-only member can also attach files to those conversations for Ronja to read, and turning the setting off refuses their uploads too.
In a read-only conversation Ronja can query, chart and run Python over data that member can already see, run a Deep analysis, and add a standing preference to Your policy when they ask her to remember one. She can also make documents and files for them — PDF, Word, Excel or CSV — and those always go to their private My Files, where only they and admins can open them. Asking her to save into any other folder is refused.
Files a read-only member’s chat produces along the way — Python outputs, generated images, the pictures Ronja renders when she opens an image, files unpacked from a zip — follow the chat. In a chat in a shared feature, that feature’s members can open them; in a project chat they go to the project’s folder when the member can save there; otherwise they stay in the member’s My Files. That last case covers Slack and Teams, and a chat someone shared with them directly: colleagues reading that conversation can’t open those files. Nothing a read-only member makes becomes visible more widely than the chat’s feature or project.
A read-only conversation can’t use Build mode, create or change anything in a feature — a table, note, workflow, app or automation — move, rename or share a file, or send email. Asking Ronja to change the Organization policy is refused.
Stored credentials stay out of their hands in the sense that matters: a read-only member never sees a credential’s value, and can’t put one into code they wrote. They can ask Ronja to read from an external database the organization has connected — Ronja only reads, and handles the credential itself. On some database engines the connected account is the only thing that enforces read-only, so connect a read-only account.
Read-only chats spend credits like any other conversation. The per-role budgets in Govern AI spend apply to them — set a budget for User Read-Only if you want a cap that’s separate from the rest of the organization.
Grant access group access
Section titled “Grant access group access”- Click the cell where a user’s row meets an access group column.
- Confirm the change. Adding: “{user} will be able to see and use everything {access group} has access to.” Removing: “{user} will lose access to {access group} and everything inside it.” Both are undoable from the matrix.
- Use the Everyone switch under an access group’s column heading to open an access group to everybody in its Space — every current and future member of that Space joins automatically (“New hires get access without an extra invite step.”), and the column’s muted checked squares with locks show that membership is automatic while it’s on. In an organization with one Space that is every member of the organization; the switch does not put anybody into the Space. A green checked square means the person was added directly; an empty outlined square means they are not a member. Your own direct memberships also show a lock because another admin must remove you. Hover a membership control to identify its state and whether it can be changed.
You cannot remove yourself from an access group — ask another admin.
Work in bulk
Section titled “Work in bulk”Select rows with the checkboxes and a bottom bar appears: Add to group, Remove from group, and Change role. Your own row is skipped for removals, and bulk role changes refuse to include you — change your own role from the per-row control.
Edit one user
Section titled “Edit one user”Open a row’s Settings link for the full user settings page. Edit the first and last name and click Save changes, change the role (including removing it — a member with No role can’t do anything until one is assigned), see the features they maintain under Maintains (see Grant a maintainer), set their region, job role and other facts under Properties (see People properties), review the user’s audit Activity, or Delete user (Remove from organization for Ronja staff). Use Users & Access above the user’s name to return to the matrix with your filters and selection retained.
Who you can remove or delete follows the roles:
- You can remove or delete someone whose role is below yours. A Super Admin can remove anyone, another Super Admin included. An Admin can’t remove another Admin or a Super Admin, and the page doesn’t offer it.
- Any Admin can remove a Ronja staff member, whatever their role.
- Nobody can remove the organization’s last Super Admin, Ronja staff included. Make someone else Super Admin first.
Remove from organization takes away the person’s access to your organization and leaves their account, and any other organizations they belong to, alone. Ronja staff only ever show this action, never Delete user, because their account belongs to Ronja. It is browser-only too, and it clears their people properties here.